Let me start by stating that Sub ohm tanks with pre-built atomizer heads are great. The ones I reviewed in 2016 were all superb. Ok I said it, now lets forget about them and move on to "custom vaping" rebuildable tank atomizers, rebuildable dripping atomizers and rebuildable dripping tank atomizers. By now you should know that these offer better flavor and versatility. The only thing you will need to do is learn how to make coils DIY style and lean to wick. The thought of building your own coils might discourage some beginners because it seems hard. It really isn't! That's why I decided to shed some light on DIY coiling and explain what it's all about.
 The first thing you need to understand that an atomizer, regardless if it uses pre built coils or DIY coils, works the same way. Electricity from the battery heats up the wire, which in turn makes the e-liquid in the wicking material evaporate. A simple pre-built atomizer head (or coil) is nothing more than wrapped piece of wire that's surrounded by cotton and sealed inside a press fitted metallic outer shell. Complex pre-built atomizer heads  can have anywhere from 2 to 8 such wires inside, all of them surrounded by a thick layer of organic cotton.
What's a DIY coil?
The DIY coil is nothing more than a wrapped piece of wire that has its ends connected to an atomizer's positive and negative posts. Then a piece of organic cotton is passed through the coil with the ends sticking out less than half an inch and then positioned inside the designated juice wells on the deck of the atomizer. It's really nothing that complicated and in order to build your first coil you will need a piece of Kanthal wire (28AWG would be ideal in this case), a sheet of organic cotton, a coil jig / 2mm Philips head screwdriver or drill bit, small vape diagonal pliers (or a big nail clipper), ceramic tweezers and elbow tweezers.
Calculate your wraps
By using a resistance calculator (smartphone app or steam engine online resource) you can get a clear understanding of the number of wraps required for your particular coil. Knowing the inner diameter of the coil (2mm in this case) and the type of wire (Kanthal AWG28) we get around 6 full wraps for a target resistance of 1.0 Ohms.
The next step is to wrap the wire around the drill bit or coil jig at least 8 times and then to release one wrap at one end and one at the other end (this will ensure a smooth and equal build). Then you need to firmly secure one end of the coil to the positive post of the atomizer and the other end to the negative post. It is imperative that you check for the resistance after this step and to do this you will need either a portable ohm meter or an electronic box mod that reads the resistance of the atomizer. If you get errors during this process then the coil is not securely connected to the posts or it touches the deck and creates a short circuit – makes sure to correct all of the error before moving on to the next step.
Spaced coils and micro coils
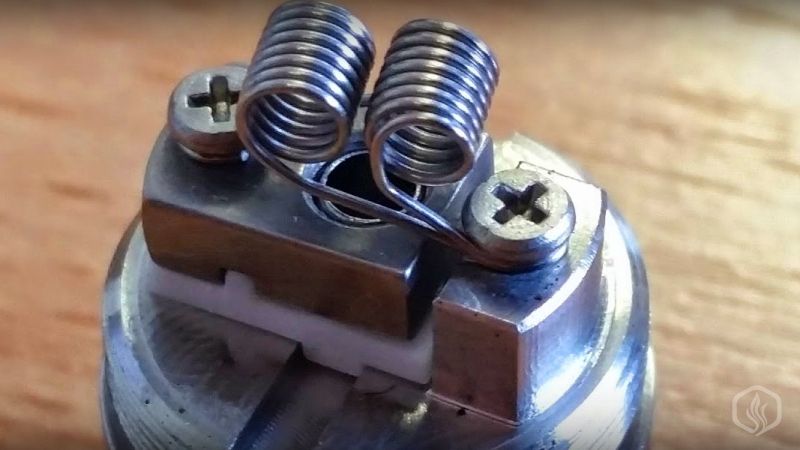
Now, some people like to use spaced coils in their atomizers, others (like me) like to use micro coils in their attires (micro-coils is where all the wraps are pressed together to form a continuous loop). To create a micro coil just press the fire button on the mod a couple of times until the coil glows red and then press it with the ceramic tweezers until the loops get "glued" together. When you press the fire button again the coil should glow from the inside to the edges and if it doesn't you will need to press it again or to gently scratch it with you tweezers until you're happy with the result.
Dealing with the cotton
 After that you will need to cut a section of the cotton (always go parallel with the long side of the rectangle) and then peel off the two thin outer layers. Roll the cotton and pass it though the coil until it reaches half length. We're looking for the cotton to be quite tight inside the coil, but not tight enough to bend the coil when you pull from any of the ends. Cut the cotton and leave enough cotton at both ends to reach the base of the atomizer deck, pour some e-liquid on it and you should be seeing vapor once you press the button. All you need to do know is assemble the atty, fill it with e-juice and you're ready to vape.